Deferred Deeplinking
Deferred Deeplinking allows you to navigate users to the correct content after downloading your app.
How does Deferred Deeplinking work?
When a user attempts to open a MovableInk Link that is designated as a deferred deeplink, and they don't already have your app installed, MovableInk will enable Deferred Deeplinking. Instead of being directed to your website experience, they will be shown a page to open the App Store to download your app.
Once downloaded, MovableInk can check the pasteboard for the original link and allow you to open that location inside your app instead.
Implementation
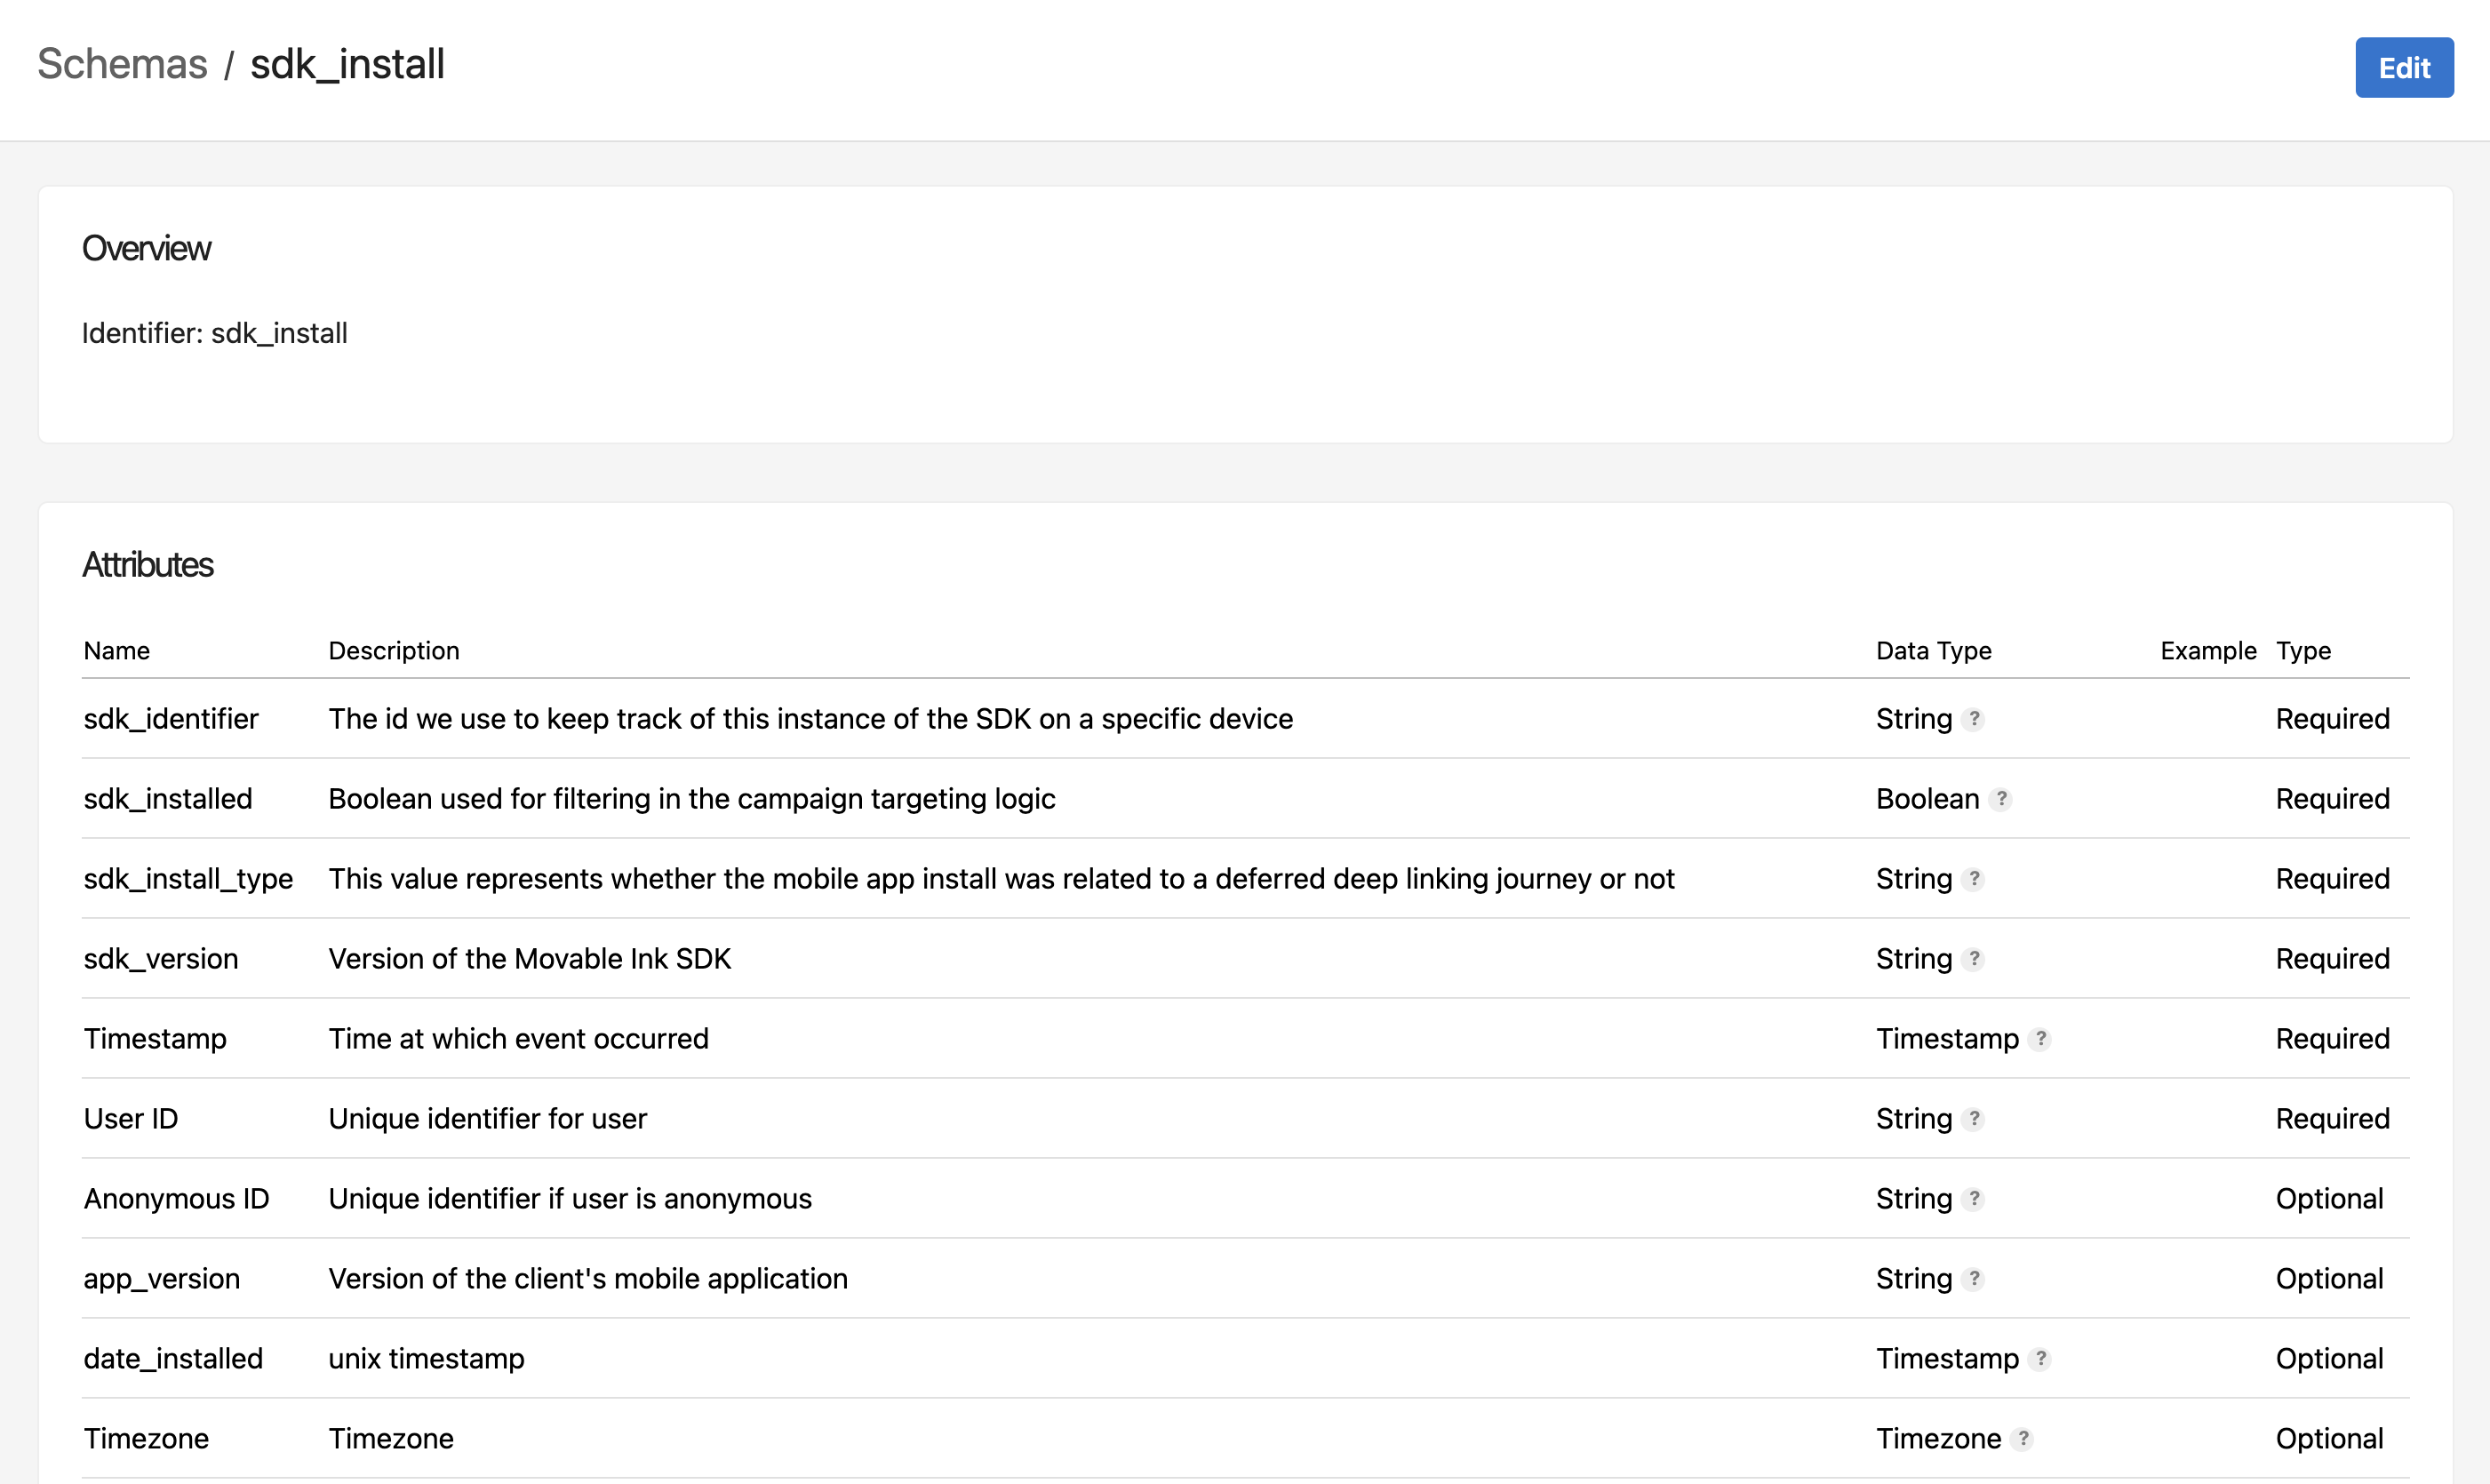
Create sdk_install event schema:
In the MovableInk Platform, make sure you have the sdk_install event schema setup. It should look like this:

You or your marketing team can go to the behavioral schemas page to check this. You can also check with your Movable Ink client experience team at MovableInk to ensure the app install event is enabled for your company.
Having this custom event setup is required for Deferred Deeplinking to work and it must match the schema exactly.
MovableInk SDK will send this event when the app is installed and launched for the first time.
The attributes for this event are:
| Key | Type | Description |
|---|---|---|
| sdk_identifier | String | The ID of the SDK instance |
| sdk_installed | Boolean | When sent, this will always be true |
| sdk_install_type | String - organic | deferred | organic - the app was installed organically or not in a deferred manner. deferred - the app was installed via a deferred deeplink |
| sdk_version | String | The version of the SDK that was installed at the time of the event |
| date_installed | Timestamp | The date and time the app was installed |
Create a campaign and a block in that campaign:
In the block, select Add Content, then Studio. You'll be taken into Designer, and the first screen will let you select components to add. Search and add Landing Page, then select Add to App.
Designer will add the component and take you to your canvas. At the bottom left hand corner, select Customize, then JavaScript which can be found under the code tab.
Insert this code above the line that starts with const app = .... Make sure to read the comments in this code and change the links (marked with CHANGE ME).
function copyAndRedirect() {
  function mobileOS() {
    var userAgent = navigator.userAgent || navigator.vendor || window.opera;

    // Windows Phone must come first because its UA also contains "Android"
    if (/windows phone/i.test(userAgent)) {
      return "Windows Phone";
    }

    if (/android/i.test(userAgent)) {
      return "Android";
    }

    if (/iPad|iPhone|iPod/.test(userAgent) && !window.MSStream) {
      return "iOS";
    }

    return "unknown";
  }

  // DEEPLINK: Set the final location of where the user should end up after installing then opening your app.
  // This can be an in app scheme or any other link that your app can handle.
  // This could also be another MI Link if you're using the MovableInk Mobile SDK.
  navigator.clipboard.writeText(
    // CHANGE ME
    "myapp://products/1"
  );

  switch (mobileOS()) {
    case "Android":
      // PLAY STORE LINK: Set the link the Play Store
      window.location.replace(
        // CHANGE ME
        "https://play.google.com/store/apps/details?id=com.google.android.youtube"
      );
      break;

    case "iOS":
      // APP STORE LINK: Set the link to the App Store
      window.location.replace(
        // CHANGE ME
        "https://apps.apple.com/us/app/youtube-watch-listen-stream/id544007664"
      );
      break;

    default:
      break;
  }

  return false;
}
Inside app.render, update the block to look like this. There may be some other code in there, just add this code after that, however, make sure that the window.APP_SUCCESSFULLY_RENDERED = true; part of the code is at the bottom of the block.
app.render(document.getElementById('react-root')).then(() => {
  ...

  const cta = document.querySelector('.tool-cta')
  cta.addEventListener('click', copyAndRedirect)

  for (let link of [...document.querySelectorAll("a")]) {
    link.setAttribute('onclick', 'copyAndRedirect(); return false;');
  }

  const fn = copyAndRedirect;
  const script = document.createElement("script");
  script.text = fn.toString();
  script.setAttribute("type", "text/x-mi-browser");
  document.body.appendChild(script);

  window.APP_SUCCESSFULLY_RENDERED = true;
});
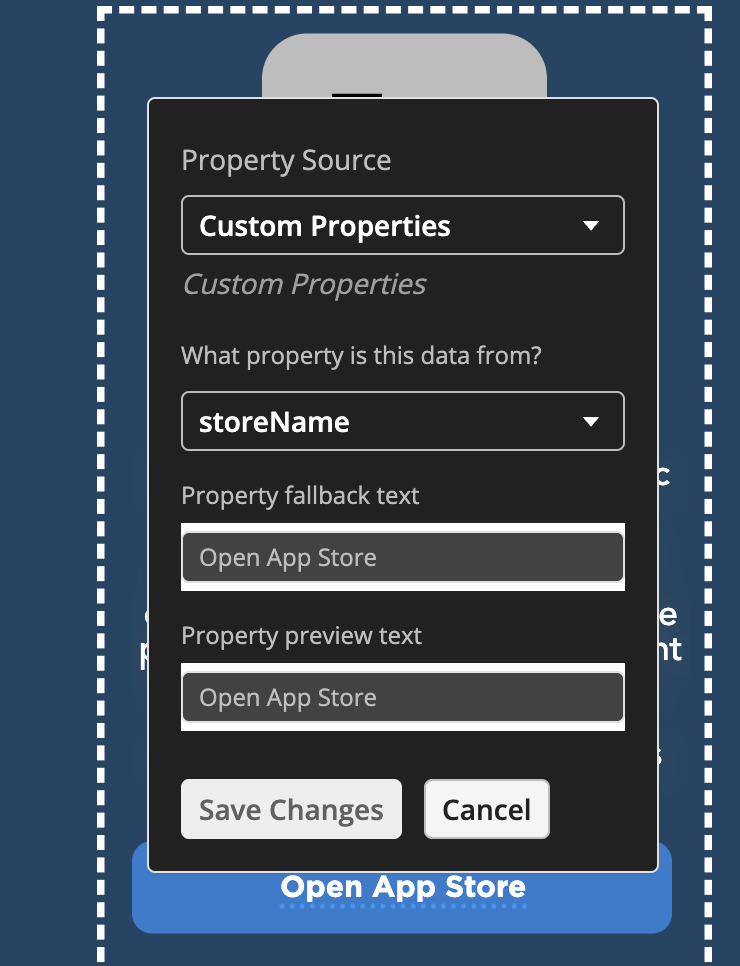
Under the Custom Properties tab, add a new property. Set the property name to storeName and its type to Text. Add a Variable, set its source to Dynamic Fields, the key value to device, and name to device. In the code block, add this code which will allow us to detect which type of device the user is using and update the text of the button on the landing page accordingly:
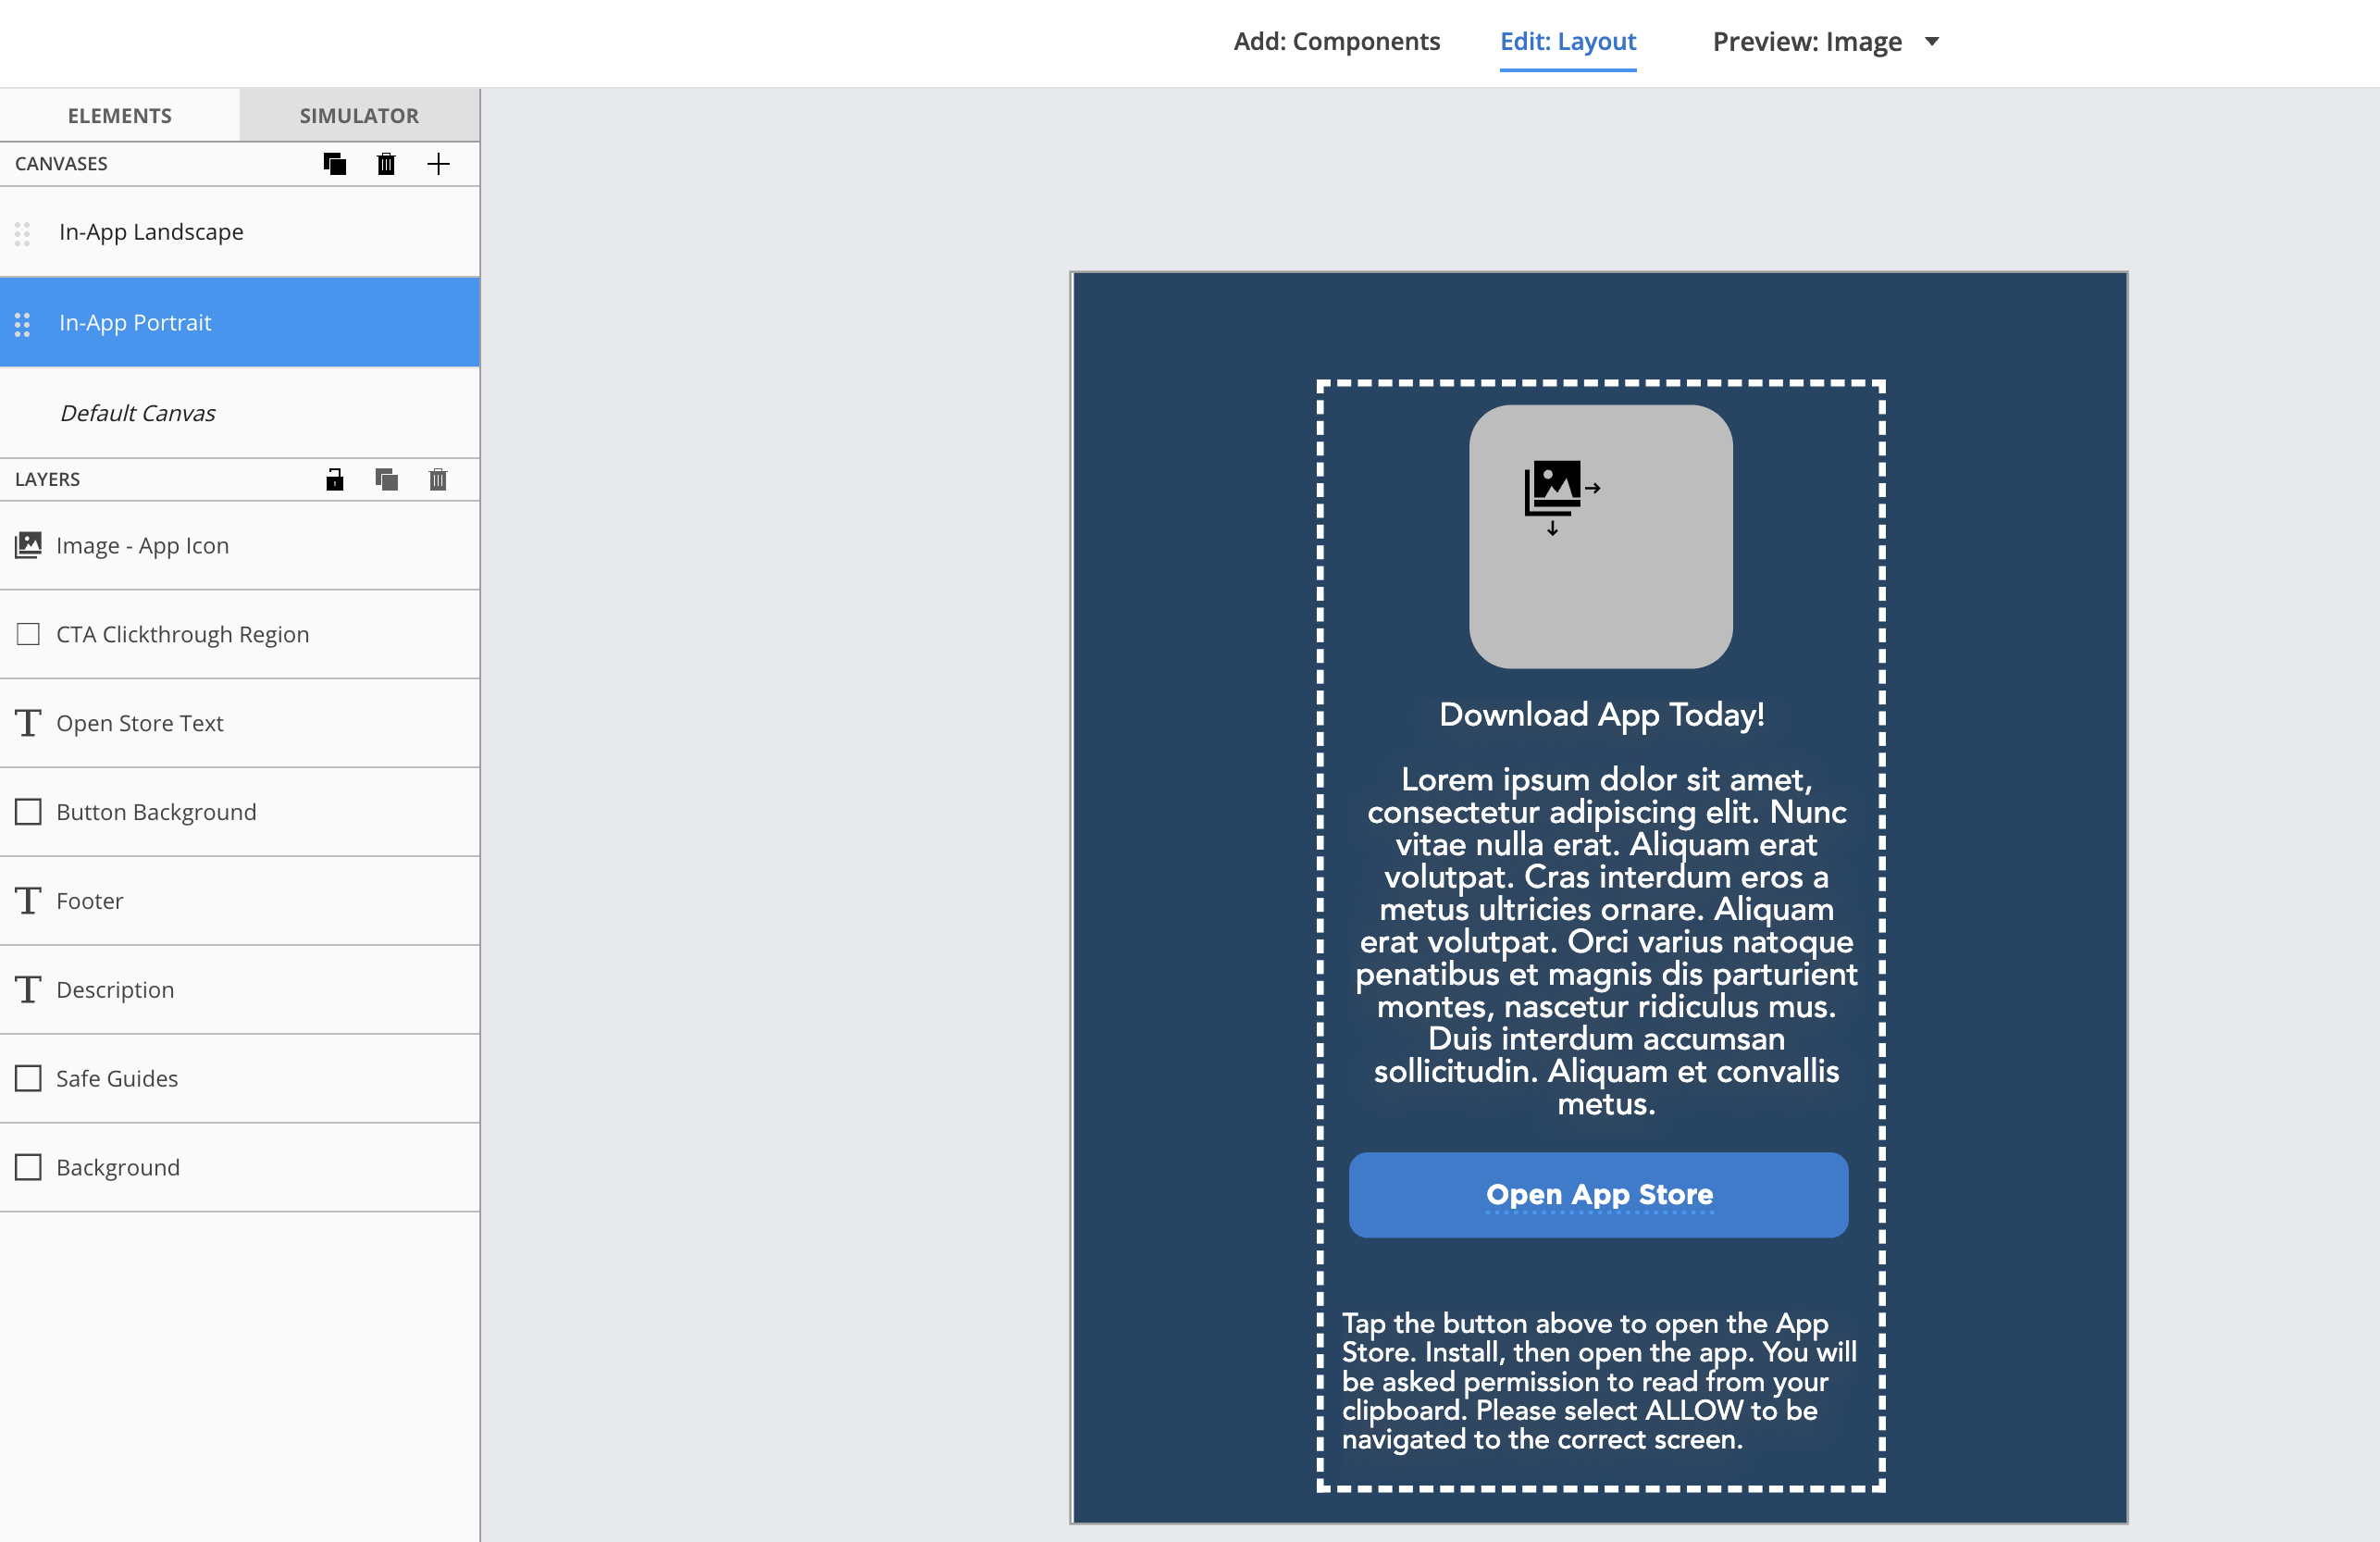
Design your landing page to look something similar to this:

Add an image for your app icon, a description, and a footer.
The footer should be:
Tap the button above to open the App Store. Install, then open the app. You will be asked permission to read from your clipboard. Please select ALLOW to be navigated to the correct screen.
For the clickthrough, add a shape to the canvas for your button background. Add text to the canvas and overlay it on top of your button background. Make the text dynamic, selecting Custom Property and storeName as the property. This text will update itself to show the correct text (Open App Store on iOS, and Open Play Store on Android).

Now add a CTA Clickthrough Region and overlay it on top of your button. You don't need to set a clickthrough link for this, you should have already set this up in the code above in the copyAndRedirect function.
Publish and test!
When your application starts, make sure to allow the app install event if you're also using Behavior Events. This allows your marketing team to utilize this information in their email campaigns. Make sure to also check with your Movable Ink client experience team at Movable Ink to ensure the app install event is enabled for your company.
import MovableInk

@main
class AppDelegate: UIResponder, UIApplicationDelegate {
  func application(
    _ application: UIApplication, didFinishLaunchingWithOptions
    launchOptions: [UIApplication.LaunchOptionsKey: Any]?
  ) -> Bool {
    // Make sure to enable the app install event if you're using Deferred Deeplinking and Behavior Events
    MIClient.appInstallEventEnabled = true

    MIClient.start(apiKey: "API_KEY", deeplinkDomains: ["mi.example.com"]) { result in
      // This closure will be called when the MovableInk SDK is able to resolve a URL
      // that opens the app into a clickthrough link, or some error if one occurred
      //
      // result is a Result<String, DeeplinkResolutionError>
    }

    // Call this anytime after you've called start. This will check the pasteboard for you and
    // if a URL was found that can be handled, the closure above will be called so
    // that you can navigate the user
    MIClient.checkPasteboardOnInstall()

    return true
  }
}
#import <MovableInk/MovableInk-Swift.h>

@interface AppDelegate ()

@end

@implementation AppDelegate

- (BOOL)application:(UIApplication *)application didFinishLaunchingWithOptions:(NSDictionary *)launchOptions {
  // Make sure to enable the app install event if you're using Deferred Deeplinking and Behavior Events
  MIClient.appInstallEventEnabled = true

  [MIClient
  startWithApiKey:@"API_KEY"
  deeplinkDomains:@[@"mi.example.com"]
  launchOptions:launchOptions
  result:^(NSString * _Nullable url, NSError * _Nullable error) {
    // This block will be called when the MovableInk SDK is able to resolve a URL
    // that opens the app into a clickthrough link
    //
    // url is the clickthrough link for a given Creative Tag
  }];

  // Call this anytime after you've called start. This will check the pasteboard for you and
  // if a URL was found that can be handled, the closure above will be called so
  // that you can navigate the user
  [MIClient checkPasteboardOnInstall];

  return YES;
}

@end
React.useEffect(() => {
  // If using Deferred Deep Linking, make sure to enable the app install event
  RNMovableInk.setAppInstallEventEnabled(true);

  // Make sure to call RNMovableInk.start when your app starts
  RNMovableInk.start();

  // Call this anytime after you've called start when youre ready to check for a deferred deeplink
  RNMovableInk.checkPasteboardOnInstall();

  ...
})
Warning
If this is ran on iOS 16+, this will prompt the user for permission to read from the pasteboard.
Custom / Without Permission Alert
If you don't want the permission alert to show at all, you can use UIPasteControl instead, however this will require you to implement some UI to show the user on first install and they'll need to interact with that control.